Measure Curve Curvature
Measure the curvature of surface edges, curves, and isoparams using a curvature comb (displayed in white) to visually evaluate shape quality and smoothness.

What is Curvature Evaluation?
The Measure Curvature tool analyzes the curvature of curves or surfaces to help you evaluate smoothness and continuity. It displays curvature combs that represent the curvature radius at different points, which is especially helpful for ensuring high-quality surfaces.
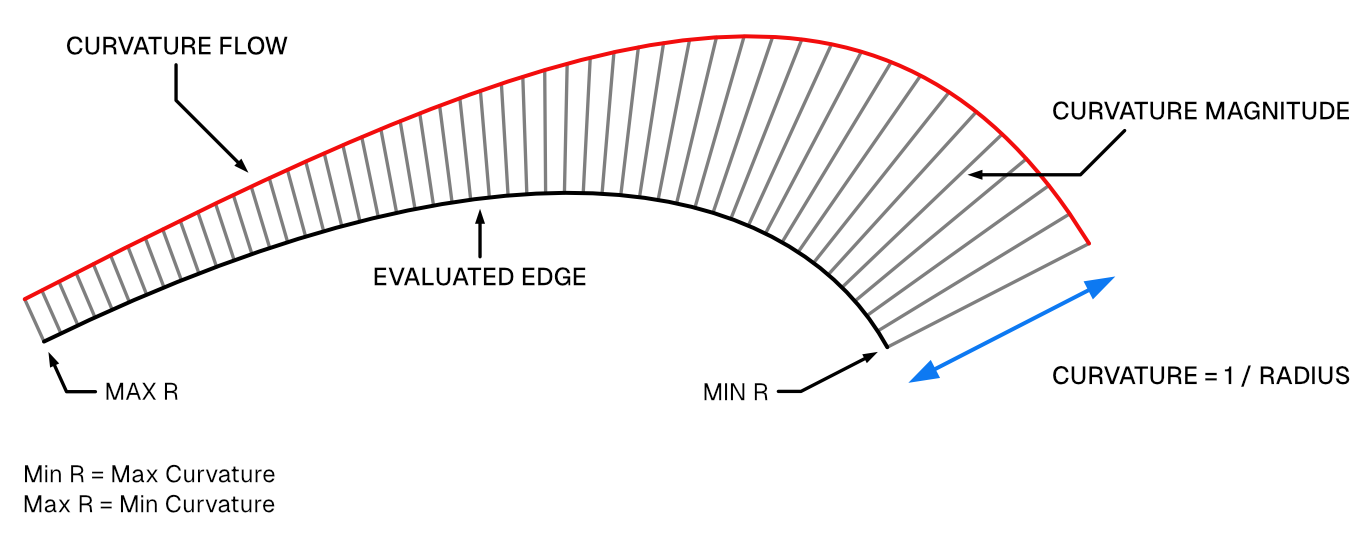
Curvature is calculated as the inverse of the radius at any given point on the curve. This value is represented graphically at discrete intervals using curvature "combs". The way these combs change along the curve - also known as the flow - gives insight into the curve's shape and behavior.
- The length of each curvature line is proportional to the inverse of the radius of the curve at that point. In other words, greater curvature corresponds to a smaller radius, which results in a longer curvature line.
- The direction of each curvature line is perpendicular (normal) to the curvature at each point.
- The red outline, in this example, represents the shape and flow of the curve.
Note: If the edge of a surface or curve is flat, the tool will show no result because there is no curvature to display.
Evaluating Continuity
Use the tool to assess whether a surface or curve maintains G0, G1, G2 and G3 continuity at connection points.
G0 (Position Continuity) - Surfaces and curves meet at the same point but form a visible corner or break in direction.
G1 (Tangent Continuity) - Surfaces and curves meet with aligned tangents, however, the radius values differ at the join, resulting in disconnected curvature outlines.
G2 (Curvature Continuity) - Curvature matches across the connection of surfaces and curves, resulting in a smooth transition with no visual or reflective break. However, the curvature outlines are not tangent.
G3 (Acceleration Continuity) - Curvature and radius values are matched at the join, and the curvature outlines are tangent. This ensures a smooth change in curvature across the junction, removing very subtle reflection breaks.
For more information on Continuity, click here.

Understanding Curvature Combs
The curvature comb plots are read by observing how the lengths of the comb lines vary along the curve from beginning to end.
Below are examples of how to read them:
- 1. When the comb lines are of equal length, it indicates a uniform radius such as in a circular arc.
- 2. Variation in the length of the comb lines signals a change in curvature, representing acceleration or deceleration in the curve's form.
- 3. Inflection is shown where the comb lines flip sides and at the exact point, the comb line length becomes zero (no curvature) and the curve is momentarily flat.
- 4. Breaks in the comb lines indicate curvature discrepancies across edit points or between two curves.

Basic Usage
- Select two adjacent surface edges.
- Type "Measure Curvature" in the Command Palette.
- Set the options in the Command Dialog.
-
Command Dialog
- Scale: Adjusts the size of combs.
-
Command Dialog
- Confirm with OK in the Command Dialog or right-click.
Info
Curvature evaluation helps you:
- Ensure surface quality: Identify and remove ripples, dents, or unintended kinks to maintain smooth transitions.
- Verify continuity: Assess whether surfaces meet with G0 (position), G1 (tangent), G2 (curvature), or G3 (acceleration) continuity.
- Refine reflection flow: Assess whether surfaces appear seamless under various lighting conditions.
- Predict manufacturability: Sharp curvature changes can pose challenges in machining, molding, or fabrication.