Download and Installation
The procedure for download and installation varies depending on the type of license you have. Please refer to the instructions corresponding to your license from the links below:
For Users with Studio License
Users with a Studio license can use both the Stable version, which is stable in operation, and the Beta version, which includes experimental features. Both Stable and Beta versions can be installed separately and used interchangeably.
The same procedure applies for both new installations and updates. Uninstallation of the old version is not required when updating.
Download and Installation
- Open the official GitHub release page.
- The latest version is displayed at the top of the release page, with past versions listed below.
- The version labeled "Latest" in green next to the version number is the latest Stable version.

- The version labeled "Pre-release" in yellow next to the version number is the Beta version.

- You can install either the Stable or Beta version, or both. The order of installation does not matter.
- Click on the version you want to download, and proceed to the file list screen.
- After clicking on Assets to expand it, click on "plasticity-*****.Setup.exe" from the list of files. The download will begin.
- Once the download is complete, open the downloaded file.
- The installer will launch, follow the instructions to proceed with the installation.
After the installation is complete, proceed with license activation, Radial Menu, and Blender Bridge setup.
License Activation
License activation is required when using Plasticity for the first time.
- Launch Plasticity.
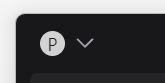
- Click on the P-menu at the top left, and click "Manage licenses."
- Enter the Token and click "Validate token."
- License activation is complete.
Radial Menu Setup
- Setup is required when using the Radial Menu. If you are not using the Radial Menu, this step is not necessary.
- For a description of Radial Menu functions and setup instructions, please refer to here.
Blender Bridge Setup
- Add-on installation is required when using the Blender Bridge. If you are not using the Blender Bridge, this step is not necessary.
- For a description of Blender Bridge functions and add-on installation instructions, please refer to here.
Installation is now complete.
For Users with Indie License
Users with an Indie license can use the Stable version.
The same procedure applies for both new installations and updates. Uninstallation of the old version is not required when updating.
Download and Installation
- Open the official GitHub release page.
- The latest version is displayed at the top of the release page, with past versions listed below.
- The version labeled "Latest" in green next to the version number is the latest Stable version. Click on it to proceed to the file list screen. (The version labeled "Pre-release" in yellow is the Beta version, which is not available for use.)
- After clicking on Assets to expand it, click on "plasticity-*****.Setup.exe" from the list of files. The download will begin.
- Once the download is complete, open the downloaded file.
- The installer will launch, follow the instructions to proceed with the installation.
After the installation is complete, proceed with license activation, Radial Menu, and Blender Bridge setup.
License Activation
License activation is required when using Plasticity for the first time.
- Launch Plasticity.
- Click on the P-menu at the top left, and click "Manage licenses."
- Enter the Token and click "Validate token."
- License activation is complete.
Radial Menu Setup
- Setup is required when using the Radial Menu. If you are not using the Radial Menu, this step is not necessary.
- For a description of Radial Menu functions and setup instructions, please refer to here.
Blender Bridge Setup
- Add-on installation is required when using the Blender Bridge. If you are not using the Blender Bridge, this step is not necessary.
- For a description of Blender Bridge functions and add-on installation instructions, please refer to here.
Installation is now complete.
For Users utilizing the Free Trial
The free trial can be downloaded from the official page.
- Open the official page.
- Download the file suitable for your OS.
- Once the download is complete, open the downloaded file.
- The installer will launch, follow the instructions to proceed with the installation.
After the installation is complete, proceed with license activation, Radial Menu, and Blender Bridge setup.
License Activation
- Launch Plasticity.
- The license screen will be displayed.
- Click "Start your free trial."
- Enter your email address and password, then click "Create account."
- Please note that we do not provide tokens for the free trial.
- Close the license screen. You are now ready to use the free trial.
Radial Menu Setup
- Setup is required when using the Radial Menu. If you are not using the Radial Menu, this step is not necessary.
- For a description of Radial Menu functions and setup instructions, please refer to here.
Blender Bridge Setup
- Add-on installation is required when using the Blender Bridge. If you are not using the Blender Bridge, this step is not necessary.
- For a description of Blender Bridge functions and add-on installation instructions, please refer to here.
Installation is now complete.
Purchasing a License
When you launch Plasticity, click "Buy a license!" on the license screen to go to the license purchase page. You can also purchase from the official page (opens in a new tab).
Entering License Token
On the license screen displayed when you launch Plasticity, enter the license token in the token entry field on the right. Click "Validate token" to complete the license activation.