Outliner
The Outliner displays all the objects you've created. Within the Outliner, you can organize objects, group them, toggle their states, and configure materials.

Displayed Objects
- The objects you create are classified into different sections: "Solids," "Sheets," "Curves," "Meshes," "Images" and "Measurements."
Displayed Construction Planes
- Saved construction planes are classified into "Planes" and are listed in the "Added Planes" menu in the right side of the screen.


Organize Objects
- Right-click on a section label ("Solids," "Sheets," "Curves," "Meshes," "Images" and "Measurements") and choose "Select all" to select all objects within that section.
- You can reorganize the Outliner by dragging and dropping objects.
Group Objects
Grouping allows you to better organize your objects.
| Operation | Shortcut | Command Name |
|---|---|---|
| Create a group and move the selected object to the new group. | Ctrl + G or | Group Selected |
| Remove the selected object from the group. | Alt + G | Ungroup Selected |
| Duplicate a selected group and its recursive content. | Shift + D | Duplicate |
Right-click on a group folder to access related commands.

| Menu | Note |
|---|---|
| Add current selection to group | Adds the selected object to the group. |
| Select all | Selects all objects within the group. |
| New subgroup with current selection | Creates a new subgroup and adds the selected object to it. |
| Move selected items to root | Relocate selected item from a group to the root directory. |
| Expand all | Expands all groups. |
| Collapse all | Collapses all groups. |
| Add material | Assigns material to the group. See Material Color. |
| Remove material | Removes material from the group. See Material Color. |
| Dissolve | Removes the group folder while keeping the objects inside intact. |
| Delete recursively | Removes the group folder and all objects contained within it. |
Alt-click on folder in outliner to select all objects in that section.
Collapse and Expand Groups

- To collapse all groups, either click (1) or hover your cursor over the Outliner and press C.
- To expand all groups, click (2) and select "Expand all" from the dropdown menu.
Rename Objects
- To rename an object, double-click on its name.
- To rename multiple objects at once, hold down the Shift key while selecting them, and then, while still holding Shift, double-click on one of their names.
Locate Objects in the Outliner
To bring a selected object to the top of the Outliner
- Select object in the 3D viewport, hover your cursor over the Outliner, and press /.
- Alternatively, select the object and click (2) and choose "Scroll to selection."
To isolate a selected object in the Outliner
- Select the object in the Outliner and press .. This will collapse all groups and sections except for the one containing your selected object.
- Alternatively, select the object and click (2) and choose "Isolate selection."
Toggle Object States
You can toggle the states of objects or groups, such as making them temporarily hidden or visible, disabled or enabled, and locked or unlocked.

Operations in the Outliner
Click on the icons next to objects or groups to change their states. You can also change states in bulk by selecting multiple objects.
 : Toggle hide
 : Toggle disable
 : Toggle lock
Operations by shortcut
You can also use shortcuts to change the states of objects or groups.
| Operation | Shortcut | Command Name |
|---|---|---|
| Hide selected objects | H | Hide selected |
| Hide unselected objects | Shift + H | Hide unselected |
| Unhide all | Alt + H | Unhide all |
| Invert Hidden | Ctrl + H | Invert Hidden |
| Hide all Curves on the same plane | Select Regions -> H |
Operations by Command Name
You can also use commands to change the states of objects or groups.
| Operation | Command Name |
|---|---|
| Lock selected objects | Lock Selected |
| Unlock all objects | Unlock All |
Material Color
You can assign materials to Solids, Sheets, and Curves. Materials set for a group will also be applied to objects within that group.
For more information on materials, see Set Material and Remove Material.
In the Outliner, you can:
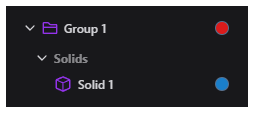
- The object's material color is displayed as color dots.
- The color can be copied by dragging and dropping the color dots.
- Material colors can also be set for groups. The color can be copied in the same way.
- Right-click on an object to access a menu where you can set or remove materials.
- You can also select multiple objects and set or remove materials in bulk.
Toggle Sidebar Visibility
Toggle the visibility of the outliner and window's right sides.
| Operation | Shortcut | Command Name |
|---|---|---|
| Toggle the display of the left sidebar. | Ctrl + B or | Sidebar: toggle left |
| Toggle the display of the right sidebar. | Ctrl + Shift + B or | Sidebar: toggle right |